here and there

Wednesday, August 30, 2017

Tea Sandwiches , Tea Party for Kids


The last time, I made tea sandwiches was for my daughter's Bridal High Tea and I thought I would never make them again.  My friend who was helping me make the sandwiches laughed and said she always had a tea party with her three daughters. This was something I never did with one daughter.  My son asked if we could babysit while his wife was away for a week with her mother.   Although he was on holiday, he was still called in for meetings.   I thought a tea party would be a perfect solution for the all day babysitting.  

Since, I have lived on making lists all my life, even as a young girl, we started with writing a list of things to do for the party.  This was eagerly done by the almost 6 year old. 
With the oldest one going into Grade One, listening skills are most important and the planning and doing the Tea Party was a great way to work on this! 


First came finding the "correct" princess outfit but in the end, the snow white costume she has worn for many years won out!  The pink and gold dress
"hurt her eyes" LOL


The younger one wanted to try the dress on too!


Next came the picking out the tissue paper colours and decorating the pink straw hats with paper flower. 


Using a loaf of White Sandwich Bread, we made a variety of different shaped sandwiches.   


  • Mermaid Sandwiches with tuna salad, pulsed with a blender - Tuna Pate
  • Pinwheel Sandwiches with above tuna filling
  • Starfish Sandwiches with peanut butter
  • Flower Sandwiches with Liver Pate
  • Cucumber Dill Sandwiches with cream cheese
  • Radish Sandwiches with cream cheese
Naming sandwiches like Mermaid, Starfish, Flower did cause interest for a picky eater. 


My box of fancy cookie cutters came in most handy although we did need PopPop's strength to cut through the bread.  Rolling out the bread with a rolling pin would have helped, but just let say with one rolling pin, it was better to skip this step! 


Adding dried maraschino cherries to the top of Liver Pate certainly made this sandwich "very yummy" for the girls!


The proper way to hold the tea cup, with the pinky finger up was demonstrated to her sister.


"I'll hold my cup like this!"


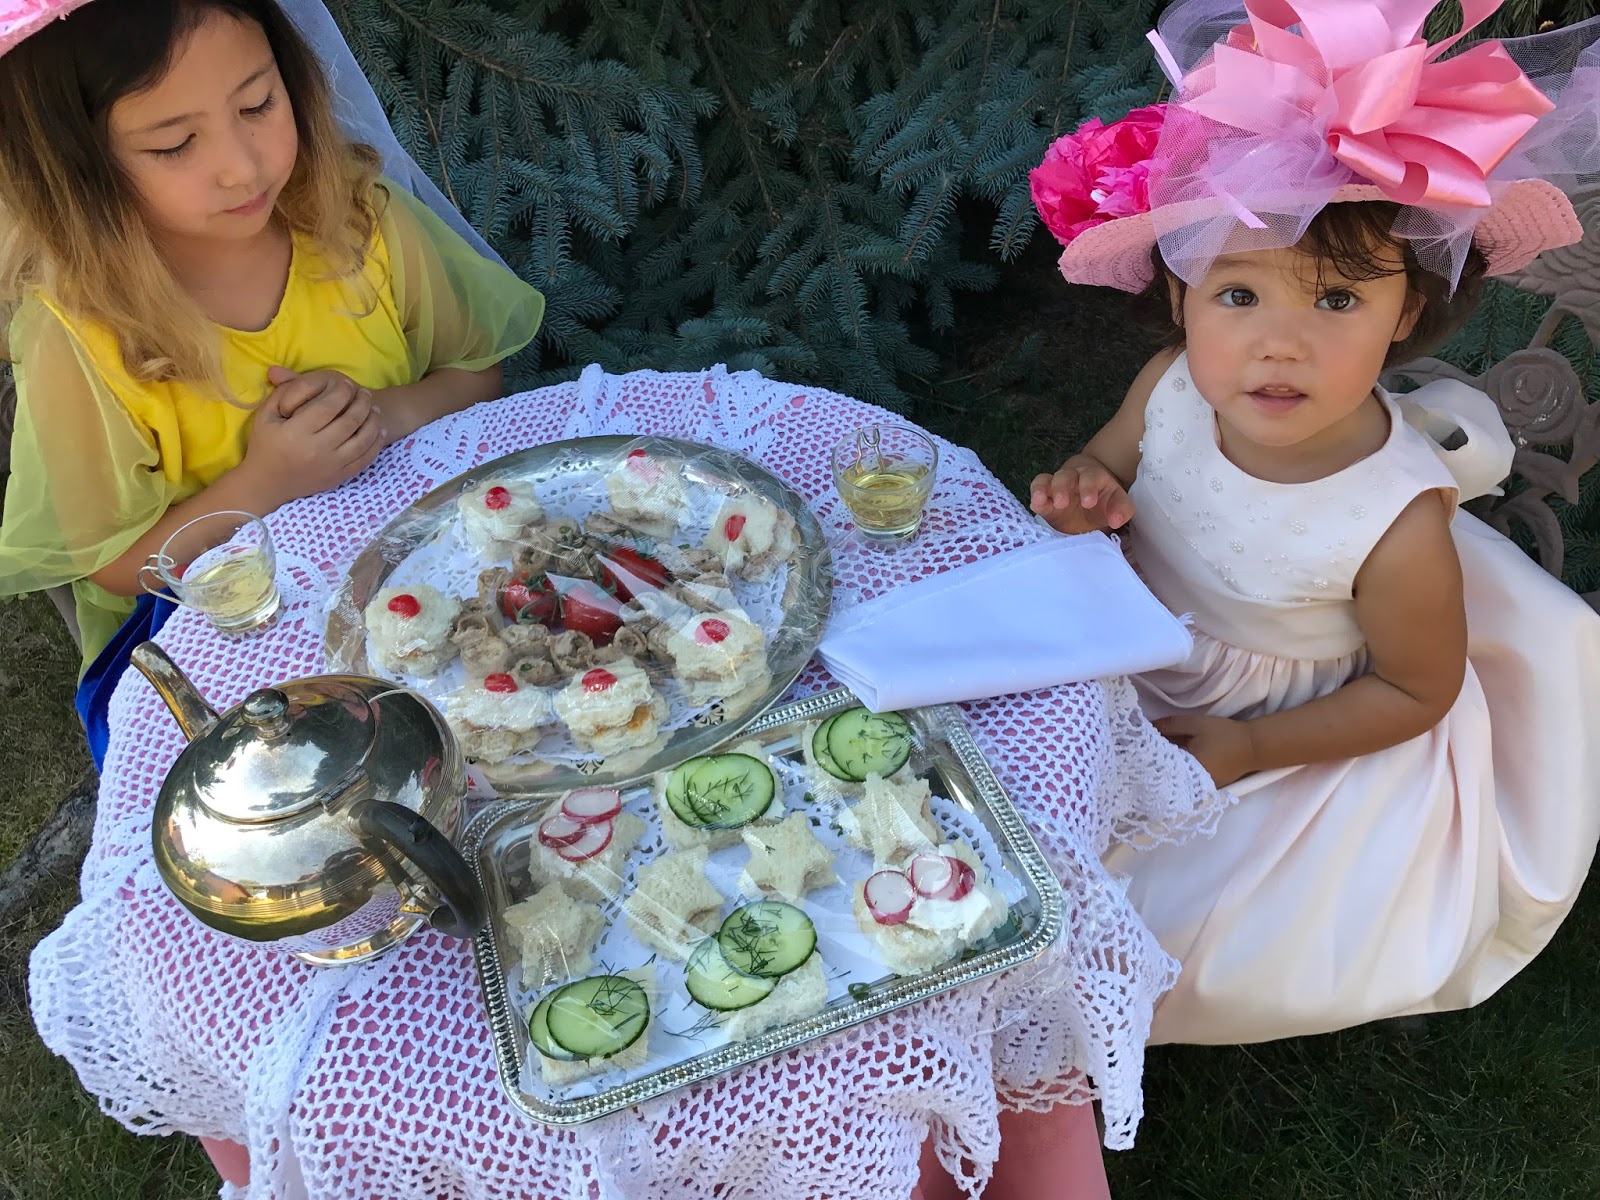
To the girls' delight, PopPop joined the Tea Party!


Sunday, August 27, 2017

Mixed Pickles

I have noticed mixed pickles on the net where the pickles have been arranged as a work of art and this year I came across a YouTube but in Russian.  I was able to get a chef in London translate the recipe for me. The wonders of Instagram!


Here is her translation for the Mixed Pickle recipe

Here you go!

the cauliflower, pattypan squash, courgettes and carrots she soaks in boiling water for 2-3 mins to soften them, as they are harder than the other veg, and need softening.

she soaks the garlic in hot water too, and onion, to make them lose some of their ‘spiciness'

The spices are, per 3 litre jar: 1 bayleaf, 2 cloves, two types of peppercorns (2 of the one that is more fragrant and 4 of the regular), pinch of mustard seeds

Herbs: currant leaf, horseradish leaf, dill stalks, 3 cherry leaves, coriander root, dill tops, horseradish root, fresh dill, lots of fresh parsley

she throws in one whole onion and 2 garlic cloves per 3 litre jar

Once all the veg is in, she first pours hot water into the jars, places the lid and covers them with towels, for 15-20 min (more is ok, but not less).
She pours out this ‘bouillon’ into a pot, puts it on the heat and adds salt and sugar. 
Per 3 litre jar: 100g sugar, 50g salt. 
Bring to a boil. 

While waiting for water to boil, she adds 90ml of vinegar into each jar. 

She doesn’t say how long she leaves them to pickle for but usually this is done in the summer, to be opened in winter. Keep in a dark cool place. 


With all the plenty of harvest, I wanted to make her recipe, even after visiting two farmer's markets, I still had to send out my husband for celery and parsley for this recipe.  It did take a while to prepare all the veggies as a variety of vegetables were used.  The Russian Pickle does use tools for fancy cuts which adds to the creativity of the display/ 


I also came across an Armenian Mixed pickle recipe which was in English.  In this recipe. the spices are a little different and she arranged her vegetables in her large container as to length of fermentation. The Cabbage and Cauliflower are place at the bottom as take the longest to ferment.  She uses a large container for ease of getting at the various vegetables to serve. 

The vegetables were similar but each did add a few different vegetables. The Armenian Mixed pickle had two beets added, one sliced for the bottom layer and another near the top. They were not cooked but only added for colour.  

The list of vegetables and order added for the Russian Pickle was;


Layer One
The follow dry spices were added to each jar

  • 2 Bay leaves
  • 2 whole Cloves
  • 6 Peppercorns
  • Mustard seeds


Base Layer

  • 2 current leaves
  • 1 small horseradish leave
  • Dill weed
  • 2 lime leaves
  • Handful of Parsley
  • Chunk of horseradish, about 1 inch piece


Press down on the base

Layers of Vegetables
Arrange in a decorative manner as you build the layers

  • slice a medium half ripen Tomatoe
  • Cucumber, large
  • Hot pepper to taste
  • Slices of bell peppers circles
  • Onion chunks
  • Carrots, julienne
  • Squash, Zucchini
  • small whole Cucumbers
  • Cauliflower Florets
  • Tomatoes small 
  • Hot pepper to taste
  • Cherry tomatoes, firm  
  • Garlic


Since my jars were smaller, I did heat 3 litres of water and followed her recipe for the brine

Brine
3 litres water
1/2 c sugar
3 Tablespoon pickling salt
90 ml vinegar

I did not soak the vegetables before hand, nor did I pour hot water into the jars and drained them.  Not sure that you need to do either of these steps! 


The spices used for the Armenian pickles were more in keeping with spices that I use for my pickles
After each layer the following dried spices were added generously.
  • Bay leaves
  • Peppercorns
  • Dill Seeds
  • Whole coriander
  • Garlic, whole but scored at the top

List of vegetables

The layering of the vegetables was as to time of pickling, the vegetables that took longer to ferment where placed at the bottom.  

In her video, Quarters of cabbage were added first
2 Beets, uncooked for color

These were the vegetables I used
  • Florets of Cauliflower
  • Squash
  • Carrots
  • Celery, cut in chunks
  • Cucumbers, leave whole
  • Hot peppers
  • Green Beans, whole
  • Parsley


I used the same brine as I did for the Russian pickles


I did have some tomatoes that I used and herbs for the base. I used horseradish, raspberry leaf, grape leave and dill weed from my garden.  The rest was bought from the Farmer's Markets.


Growing tomatoes is a Challenge in this area due to cool evening. I have started growing tomatoes in pots as love that there are no bugs, no weeds and easier to maintain! But other challenges exist, especially if your dogs like vegetables and fruit!


Wednesday, August 16, 2017

Chinese Steamed Buns , Steamed Bao

My grandchildren love Dim Sum and I have been finding recipes for them to try which has sent me researching how to do this. I must add that although I don't like Dim Sum, I love the social aspect of it and especially the carts that go table to table for patrons to select items which is always intriguing! 


The first step was to cut out pieces of parchment for steaming the buns on in the Bamboo Steamer.  This was a challenge for a six year old with regular scissors.


After studying the recipes for steamed buns, I realized it was just a regular bread dough recipe, although some used Baking powder other used both yeast and baking powder.  Once again my Refrigerator Bread Dough came very handy.  Especially when you unexpectedly have to babysit!  

On a counter, you see the container that was used to pack store bought BBQ chicken. This container is the best to store fresh dough in the refrigerator as the dough's gases do not blow of the lid and the container is also vented. 

I had enough dough left to make 6 buns.  The dough was rolled into a log, 6 pieces were cut off.

Each dough piece was rolled into a long strip, which were brushed with oil, then folded over and allowed to rise. 


Strips of pork cut from a pork loin roast where marinade in a lemongrass marinade. 


The marinade pork was baked in a hot cast iron skillet at 450 degrees for about 10 minutes, then grilled for 3 minutes under the broil.


I added the buns to the steamer when the water was boiling.  I read today in order to have soft buns, you place them in the steamer and let them sit for 10 minutes before turning on the heat, then bring the water to boil, steam the buns for 5 minutes, turn off the heat and let the buns sit for a few minutes before removing them from the steamer. This apparently makes very soft white buns which do not collapse. I did not know how long to steam and I did steam them for 10 to 15 minutes.   


 The steamed Bao were filled with slice cucumber, Asian flavour Coleslaw and Marinaded Pork Strips.  Hoisin sauce or hot sauce was added 


My grandchild was so impressed that she wondered if she could do this for her birthday party in Sept. 

Monday, August 14, 2017

Rice Noodle Rolls. a study on techniques used


My granddaughters love dim sum and I am always looking for activities to do with them when I babysit. 

I can't believe that there are so many ways to make the rice noodle rolls; fry, steam and even microwave.  The steaming process also varied.  Videos of this being prepared on the Vietnam as street food, showed some vendors steam the noodle on cloth, others steamed the noodle on a baking sheet that fits into a steaming oven.  The batter used for the street vendorsis very thin and is cooked very quickly, then quickly rolled into a roll.

I am a cast iron cook and do crepes on these pans with success.  So I first used my cast iron, even a no stick pan and each crepe stuck!!  I was so tempted to add an egg to the batter!  The steaming method worked better, I used two casserole dishes, but found after each baking, they had to be cleaned. Hmmm! The results were delicious just not pretty to look at! 


The batter 
This is the first recipe I used and it does need to have more liquid added as is thick.  See below for the modified batter used.  I have added this recipe to the blog as rice flour can be found in the Asian aisle of a supermarket.  


  • 1c Rice flour 
  • 1c water
  • 1 T oil
  • salt 


Loosen the side of the noodle from the dish with a spatula and let cool. 


Tiger shrimp was steamed for the dish and coarsely chopped.


Let the noodle cool before handling as the noodle will rip when lifted to add the filling if you don't let it cool for a few minutes..


This weekend, my son invited us for dim sum with the girls and I took great interest in their Noodle Rolls


The noodle roll also had ripped and fallen apart with handling!


As you can notice the end is very thick and was also gummy!


Back to the drawing board to review the batter.  Most of the batter used more water in portion to the dry ingredients as much as 1/2 to 1c of water.  The flours varied in mix, some used just rice flour, some a combination of Tapioca and Rice flour, other also added Cornstarch or Potato starch to the Rice and Tapioca flours.  


This time my batter was 
  •  1 1/3 c Rice flour
  • 1/3c Tapioca flour
  • 1/2c Cornstarch
  • 2 c lukewarm water
  • 2 c boiling water
  • salt
  • 1 Tablespoon Oil
This batter used lukewarm and hot water as in this Savoury Rolled Cakes


Method

  • Whisk the mixture and before each pouring
  • Spray the rectangle container* with oil or use a brush to cover lightly
  • Pour a very thin layer in pan, this can either be steamed in your wok, or
  • Microwave for 1 minute at a time and check if the crepe is done.  In my microwave on high power, it took 2 minutes.
  • Brush the roll with oil 


*The containers that are used varied, some used an aluminum pie plate or baking dish, another a 8X8 steel pan, which just floated on the water in the WOK to steam. 
Another lined the container with saran wrap and lifted the saran warp to the work area.  Not sure how safe it is to cook on saran wrap. 
Some had muslin cotton sewed with a cord to tighten around a pot to steam the noodle.  
Many recipes use a non stick frying pan with a lid to steam the noodle with success. The cooking time was also much shorter here. 

Depending on the method used to cook the noodle, the cooking times vary, although I did find you can not wreck the noodle in cooking only in handling the noodle.  I was after a very thin noodle, but this also varied, some were about about a 1/4 thick, so again personal preference.  Some had filling scattered on the noodle while cooking, while others added their filling to the batter!  The world of Rice Noodle Rolls was most intriguing, given that I am not a dim sum fan!  


Let the noodle cool for about a minute, add your filling to one end and roll.  


This batter worked well although it did take a longer time to steam it, some of the recipes said it took as long as 10 to 12 minutes. then I remember that you can also microwave it.  The above is the picture of the microwaved noodle.  

This worked well and I will be doing this with the granddaughters as certainly safer than having a wok with boiling water!


Filling


  • Ground pork
  • Mushroom, chopped
  • Ginger
  • Onions chopped
  • garlic, chili flakes opt
Sauté the onion and mushroom in olive oil.
Sauté the ground pork until cooked, break up the large pieces
Add Minced garlic and minced fresh ginger.


Dipping sauce can be your favourite sauce; Sriracha, Hoisin Sauce or Nuoc Cham 

Nuco Cham 
1 lime ( juice and rind)
1 T sugar
1/4 cup water
2 tablespoons fish sauce
1 small garlic clove, finely minced
1 or 2 Thai chilis, thinly sliced or 1 teaspoon chili garlic sauce
1 shredded carrot


Now all  these noodles need is a garnish of julienned cucumber, lettuce, Julienned carrots and herbs!