Tuesday, December 20, 2016

Christmas Day Dinner past!


  • This photo has generated a lot of messages from my brother. He remembers building the red willow crib by the tree with our Dad.


    This is a picture of Christmas past; check out the slices of baked ham with radish roses, a raisin sauce would have been served hot in a gravy bowl is on the stove kept hot, cheese stuffed celery with pimento olives, cranberry sauce, a three tiered crystal serving dish with assorted desserts along with a plate of white fruit cake. In the oven would be side dishes, cabbage rolls and pyrohies to be served piping hot along with mashed potatoes and gravy. 


    All the side dishes would be added to the table to be served hot after grace. A steam pudding with a brown sugar sauce would finish the meal. My menu is very similar to my Mom's. Got to love tradition! Do notice that there are no wine glasses on the table, serving wine was not the norm. Orange Pekoe Tea would have been served with the desserts! 


    By the fresh spruce tree is a birch wood candle holder that my dad made and my mom decorated with fresh spruce and red ribbon and red candles yearly.  Yes, that is holly on the table. A bowls of oranges and nuts are also on the coffee table.. Not sure where that box of chocolates is!


My mom always sliced the turkey in the kitchen before plating it on a large platter along with the dressing. 
This was a new red dress that my mom had bought for me for Christmas and wanted a picture of me in it. 

Check out the black phone on the end table by the couch.

The Christmas tree is a fresh spruce that my Dad would have chopped on his farm.

Saturday, December 10, 2016

Cabbage Rolls, Rice Holubtsi for Christmas Eve


Another dish that is prepared for Christmas Eve is Cabbage rolls or Holubtsi.  The recipe that I prepare is how my Mom prepared them for this meatless supper.  My grandmother would not have used butter as her meal was dairy less and meatless.  Some still follow this tradition of what would now be considered a vegan diet.  


Cut out the core of the cabbage so that it steams and is easier to pull of the leaves without the leaves tearing.  You can also freeze the whole cabbage and when unthawed the leaves are also pliable and easy to remove, but this means having the cabbage thawed before you make the cabbage rolls.  I prefer to steam the leaves.


Place the head of cabbage into a pot to steam with the core down.


Use two forks to carefully remove the pliable leaves. Being careful not to burn yourself!


The stack of leaves ready to be rolled. 


The steamed leaves are cooling before being rolled.  Yes, the house has a pungent aroma! 


Cut out the hard spine of the leave or cut down the spine so that you can still roll the leave.. The larger leaves you can cut out four pieces to roll.  The leaves become smaller as you come to the end.  I make small rolls without tucking in the ends.


Place a tablespoon of cooked rice in the leaf and roll!  Place the seam down into a prepared pan. The enamel roaster that are used for larger group, are usually layered with the outer covering leaves of the cabbage.  My aunt uses tinfoil to cover her enamel roaster. Yes, she still does roasters of  cabbage rolls at the age of ninety five. 


The sauce for the casserole is a can of good quality tomato soup, pour over the rolls and grate frozen butter on top, wrap in tin foil and freeze until ready to bake at 350 for one hour or until the cabbage leaves are cooked.

Friday, December 9, 2016

Sauerkraut Pyrohy for Christmas Eve


Once again, preparing dishes for the meatless Christmas Eve Supper.  As I prepare this dish, I think of my Mom and how skillfully she managed this beautiful meal with twelve dishes some that were served piping hot.  I never thought much about this until I had to do Christmas Eve meal all by myself!  Now I marvel how efficiently and without effort this was done by my Mom and Grandmother.  I am not at that stage yet!  Sadly, I do not think this tradition will be continued. 

Once again, I used this recipe that uses 4 cups of flour with about 8 dozen of Pyrohy made from this recipe.


The sauerkraut filling was first washed and squeezed dry.  Something my Mom always did as she said that the sauerkraut was too salty.  Chop and sauté one white onion until soft in Olive Oil.  Add the washed sauerkraut and sauté until the filling is dried.  This helps in making the dumpling.


The ends are pinched together to form a circle.  Something my Mom always did to be able to tell the differences in fillings in the Pyrohy.


These fresh Pyrohy are placed on a cookie sheet that has been covered with saran wrap. They are placed on a lightly dusted flour and placed so they are not touching.  After they are frozen, they are packed into a ziplock bag.   They are dropped into boiling water and are cooked when they float to the top.  Toss in olive oil or butter and serve hot.

Cheese and Potato Pyrohy


As the world becomes more commercial and less and less focus on the "baggage of religion" as a Globe and Mail journalist writer commented in a recent article, I still find comfort and connection to Christmases past, with thoughts of my Mom and Grandmother and the true meaning of Christmas.   The Magic of Christmas along with the traditions seem even more important to me these days.

The preparation for this year's Christmas Eve Meal has started using this pyrohy recipe, one I find most manageable with the result of 8 dozen dumplings. 

Check out 12 dishes of Ukrainian dishes  for the Christmas Eve meal as part of the traditional meal that have been passed down to me. 


The filling for this recipe is potato, ricotta cheese and cottage cheese.  I use a small container of cottage cheese and ricotta cheese and had cooked 2 medium sized potatoes.  I find that the ricotta cheese adds great flavor and is the closes in taste to homemade cottage cheese. I use the regular cottage cheese and just drain the liquid in it first.


My son has wanted me to show to my granddaughters how to make the dumplings, so I had saved some dough and filling for them to use. 


The girls loved making the dumplings, as I busied myself taking movie and pictures of them! 


Since some of the filling was popping out in some of the dumplings, if not all of them, frying the dumplings in Olive oil was a good solution.

The girls quickly devoured their master pieces with sour cream!!


Monday, November 7, 2016

Blitz Torte


Years ago, I tasted a cake that meant "Cloud Cake" in German.  In serving this cake, the German lady stated she "never" shared her recipes!  This I can never understand as I love coming across a recipe that has been give to me.  I usually date and name the recipe with the person's name.  When I come across the recipe, this brings back memories of this person and when it was  given to me.  


Her Cloud Cake had layers of cake, meringue and a lemon filling.  The meringue was on top and the cake did look like a cloud cake.  In my search, I could not find this cloud cake, until recently when I came across a cake called "Blitz Torte" on a Instagram post.  Blitz Torte means Lightning Cake that not only looks beautiful with a meringue topping with toasted almonds but has different textures and flavors.  

I planned to do this for my husband and son's birthdays which are a day apart.  Since I was at a pastoral care conference all weekend, I didn't think I could make this cake with a meringue ahead of time. 


The cake was very quickly made and baked with a meringue layer on top in a springform pan.  The meringue had baking soda added to it which was different from other meringue recipes I have made.  The base was also more like a cookie base than cake. 


The recipe I followed was German Blitz Torte by Omar with modifications

Blitz Torte 
  • Preheat Oven to 325
  • Prepare 2- 8 inch springform pans with grease and flour.

Meringue
  • 4 egg whites
  • 2/3 cup granulated sugar
  • 1/3 tsp baking soda
  • handful of sliced almonds
Whisk egg whites until soft peaks, add sugar and baking soda gradually.  I probably would use less sugar next time.  
Cake

  • 1/2 cup butter
  • 1/2 cup granulated sugar
  • 4 egg yolks
  • 6 tbsp milk
  • 1 cup flour
  • 1 tsp baking powder
  • 1 tsp almond flavouring


Cream sugar and butter until light, add egg yolks, gradually mix in flour and baking powder, stir in the milk and flavouring. 


Spread half of the mixture into the pan. There wasn't very much batter, so it is a thin layer.  


Then spread half of the meringue on top, making sure the meringue covers the base and touches the edge of the pan all around. Sprinkle sliced almonds on top of the meringue


Bake at 325 for 35 to 40  minutes.  I reduced the heat to 275 as the top was browning too quickly.


I used a instant chocolate pudding for the filling and my granddaughter decorated it with Raspberries. 


The two birthday boys were very pleased with the cake


Monday, October 24, 2016

DIY Maleficent Costume for a Birthday Theme Party!


  • After hunting for a head piece for a dress that was perfect for a Maleficent costume and finding a head piece that cost seventy dollars, I decided to sew the head piece.  I had found DIY tutorials for making the horns out of cardboard, which was very involved and too detailed!  Too many steps for me!  After seeing the head piece made out of thick foam fabric, I decided "How difficult can this be" to sew!


    I had sewn all my children's Halloween customes when fabric was not expensive and  when it was cheaper to sew than buying pre made costumes.  And although I did use a pattern, most times the patterns had to be adjusted to what the children wanted or visualized the costume to be!

    Buying fabric is an experience now as there is only one fabric box store in the city.  While shopping, one realizes that sale prices apply only to Members and since I do not sew enough anymore, thirty dollars for a year's membership is ridiculous!   Checking out the discount area, the cost has gone up from $1.50 to later $2.50 to now a range from four dollars to eight dollars.  There was a dollar off all discount fabric but only for members!  Although, I only needing about a half a metre, I was told that since it was discount fabric, I had to buy a whole metre!  Unhappily I said I would take a metre, thinking of all the full boxes of unused fabric I had in the house.  The fabric had been cut by scissors resulting in a  irregular edge.  I asked the server to rip the fabric which resulted in me walking off with about a metre and half!  Oh great, I thought .."More Fabric", even though in total it cost me four dollars!

Sketching out the shape of a horn and cutting out 4 pieces of fabric for the horns, which were stuffed with polyfill stuffing. 


A pattern for a rabbit head bonnet was used. Since it was children's size, I increased it a bit for me. 


The back of the bonnet was gathered at the seam line using an elastic from the top of the seam to the bottom.. I had wished I had cut the length of the bonnet longer at the bottom to cover more of my hair.  I had also gathered in the middle of each side but this made the bonnet to small, so left on a little bit of the elastic.  I could have lined the bonnet but felt it would be too hot to wear at a house party.  The edges of the bonnet were hemmed. 


The next step was placement of the horns, which were sewn on to the bonnet. 


 Since the horns were only filled with Polypill stuffing did not sit properly on the head.  The solution was a leather strip that went around the bonnet and also was used to glue the horns in place so they sat firmly. 


Using the piece of fabric that had be cut irregularly for the head piece, I still had close to a metre left!


Although I had a perfect dress for the costume, I decided to wear a long black dress and sew a cape for the costume.  A trip to the Dollarama store in our neighbor found the prefect solution to a Maleficent cape.  The cape was trim with Pinking shears at the bottom, the top was gathered and trimed with a bais tape cut from the fabric to trim the edge and make a tie. 

My solution to making a stand up collar and supporting it on the cape was to buy a wired bat with sparkles and place the bat upside down so the wings were the ruffled top.. I did need feather but Dollarama no longer sold the Feather Boa!  


As one know the best critics of Disney characters are the children that have watched the movie! We dropped in to show the customes to our five year old grandchild. Her first reaction was shock which quickly followed to recognition after silence and a steady study, " You're Maleficent".  Yes, I had passed the test! 


My husband went as Sebastian, the Bad Butler!


  • On to the Theme Birthday Party!


    One never quite know what to except when you enter our friend's home for their Annual Birthday theme parties. Each room had been draped with fabric and lit with different lighting.


    This year the theme was Good Versus Evil!

The birthday girl! The Queen of Hearts from Alice in Wonderland


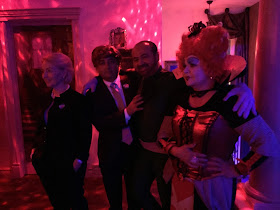
In spite of their busy schedules. Hilary and Trump made an appearance.


I


What would a party be without food!


And a special cocktail just for me, Maleficent ! I understand it was delicious!


Now is Santa Good or Evil?


Someone wore her beautiful wedding dress that looked specutular in the Florescent Light! Not sure if this was Good or Evil!


Hilary drumming up support from Santa!


The Staircase to Heaven! With an angel at the base!